Section 3: Making and Editing Scenarios
This chapter describes how to create a scenario, and how to edit the general scenario properties. As mentioned before, something marked (Advanced) can be ignored by people who aren't interested in making more complicated scenarios.
The File Menu
You use the File menu to load new scenarios and save scenarios youve edited.
- New Scenario... - This makes a new scenario.
- Open... - Select this option to load in a new scenario.
- Close - Closes the currently-open scenario and returns to the start screen.
- Save - This saves your changes.
- Save As... - Like above, but also lets you choose where to save it.
- Revert to Saved - Reloads your scenario from disk, reverting any changes you've made since you last saved. It will ask you for confirmation first.
- Quit - This closes the program. If you've made any changes, you will be asked if you would like to save first.
Scenarios made in Macintosh and Windows are interchangeable. A scenario edited on the Mac can be run on a Windows machine, and vice versa.
Creating a scenario
When you make a new scenario, two dialog boxes will come up, asking you for information about the scenario to make:
First Dialog: Enter the name of your scenario and your name for credit purposes (not yet used). To make the terrain for the surface be grass and mountains (as opposed to cave), press the small button. When done, press OK, or Cancel to stop the process.
Second Dialog: Enter the width and height, in 48 x 48 sections, of the outdoors. This can be changed later, but keep in mind that outdoor sections are small.
In the second section, enter the number of towns the scenario will start with, of the three different sizes. The large towns will be placed first, followed by the medium towns followed by the small towns (so if you select 3 large towns and 3 small towns, towns 0 - 2 will be large, and 3 - 5 will be small). The exception to this is that if you want your scenario to have Warrior's Grove, this will always be town 0.
Finally, select Include Starter Town to have one of your Medium Towns (town 0) be Warrior's Grove, a pre-made town.
Finally, you will be asked for a final go-ahead, and your scenario will be built. Note that cancelling from the Save dialog does not cancel the creation of your scenario; it just skips saving it to disk,
The Scenario Menu
A lot of things for your scenario are set using the Scenario menu.
- Create New Town - This tacks a new town onto the end of your scenario's town list. If you currently have 8 towns, for example, the new town will be town number 8 (your 9th town). Creating a new town is described later in this section.
- Resize Outdoors - This resizes your outdoors, adding or deleting sections as needed. You can extend or shrink the outdoors in any of the four directions, but keep in mind that if you extend or shrink along the left or top, references to outdoor sections (for example, in special nodes) will now refer to a different section (or worse, a section that no longer exists). The dialog displays a list of the outdoor sections that would be deleted by your change. If possible, the outdoor section currently loaded is unchanged by this operation, but if that section is deleted, then section (0,0) will be loaded instead.
- Scenario Details - This dialog sets the information the player will see when they're choosing your scenario in the Custom Scenario Window in the game. You can set your scenario's version (it starts at 1.0.0), a brief description (each bit of text can be at most 60 characters long), contact information for you (such as an E-mail address), your scenario's rating (G to NC-17), and a guideline for how experienced the player's party should be before they do your scenario. Note that you can't control the level of adventurers the player takes into your scenario. They are free to take as weak or powerful a party through as they want. All you can do is warn them how tough your scenario is in advance.
- Scenario Intro Text - Select this to edit the text the player will see when first entering your scenario, Press the Select Icon button to pick the graphic the player will see by your scenario when in the Custom Scenario Window.
- Set Starting Location - The scenario must have two starting locations. The first is the town the party will start in. The second is the location in the outdoors the party will be in with they leave that town. Select this to set the first location, the starting location in a town. Enter the number of the town to start in, and the starting location in that town.
- Edit Special Nodes (Advanced) - This moves you to the main screen, where all of the scenario's special nodes are listed to the right. Click on a node to edit it.
- Edit Scenario Text (Advanced) - This moves you to the main screen, where all of the scenario's text messages are listed to the right. Click on a message to edit it, or alt click to clear it.
- Edit Journal Entries (Advanced) - This moves you to the main screen, where all of the scenario's journal entries are listed to the right. Click on a message to edit it, or alt click to clear it.
- Import Town (Advanced) - You can import a town from another scenario (or the same scenario). The town pulled in will be copied over the current town in memory. After selecting this option, you will be asked to select a scenario to import it from (you can select the scenario you are working on, but keep in mind that it'll be loaded from disk, so some changes may not have been applied), and then to select the number of the town to import. The scenario will be loaded in, and the selected town will be copied over your current town. The town selected doesn't need to be of the same size (small, medium, large) as the current town.
- Import Outdoor Sector (Advanced) - This works pretty much the same as Import Town (above), but replaces the current outdoor section instead.
- Edit Saved Item Rectangles (Advanced) - You can set three rectangles in towns where the party's items can be stored (i.e. they won't disappear when they leave town). Enter the number of the town, and the top, left, bottom, and right of the rectangle where the items will be remembered. To have no rectangle, leave the town number at -1. The three towns must be different.
- Edit Horses (Advanced) - The scenario can have up to 30 horses, which must all start in towns. Enter the number of the town the horse is in, and the horse's location. If the horse isn't owned by the party, click on the button to the right. Press the arrows to edit other horses. When you place a horse in a scenario your party is already in, the horse does not actually appear in the scenario until the party enters a town. If the party is in a town, it won't appear until they leave the town and re-enter.
- Edit Boats (Advanced) - The scenario can have up to 30 boats, which must all start in towns. They are edited the same way as the horses (above), and new boats don't appear until the party enters a town.
- Set Variable Town Entry (Advanced) - When they party enters a town, you can have the town they enter change, depending on the value of a Stuff Done Flag. Enter the number of the town, and the two parts of the Stuff Done flag to add to the town number when town 8 is entered. Example: Town 8 may be destroyed. When this happens, set Stuff Done Flag (3,4) to 1, have this flag added to town 8, and make the destroyed version of the town be town number 9.
- Set Scenario Event Timers (Advanced) - You can have a special node called every so many moves while the party is playing the scenario. Enter the interval between node calls on the left, and the number of the scenario special node to call on the right. Press the Create/Edit button to assign or edit the special node. Leave the time at -1 for no node to be called. Note that calling a special node takes some time. Don't set the interval too small, or your scenario won't play as well. The interval between calling a special node must be a multiple of 10 (such as 30, or 100, but not 55). Example: If the time is set to 100, and the node is set to 15, scenario special node 15 is called every 100 moves, no matter where the party is.
- Edit Item Placement Shortcuts (Advanced) - You can create 10 item placement shortcuts. This can enable you to place preset items in towns much more quickly. When Add Random Items is picked from the Town menu, the editor sorts through these shortcuts, and places random items on the terrain types you select. When editing a shortcut, first select a terrain type (press Choose to the upper right), and press the button to the left if you want the preset items to not be the partys property. Then select the items to place on a terrain type of this sort. Press one of the 10 Choose buttons below to pick an item, and then enter the percentage change (0 - 100) of the item being placed. Example: Suppose you want a pair of pants to appear in 25 percent of the dressers in a city. Press the Choose button by the terrain space and select Dresser. press one of the Choose buttons below, and select pants. Finally, enter a 25 in the chance spot.
- Delete Last Town (Advanced) - This deletes the last town in the scenario's town list. You can't delete the last town if there's only one.
- Write Data To Text File (Advanced) - It is often convenient to have a list of all your scenario's terrain types and monsters. Select this, and lists of your terrain types, items, and monsters will be dumped into a text file titled Scenario data.
- Do Full Text Dump (Advanced) - It is also often very convenient to have a complete printout of all the text in a scenario, especially for proof-reading. Select this, and all of the scenario's special messages will be dumped into a file titled Scenario Text. This may take a while - be patient.
Making a New Town
When you select Create New Town, a dialog box will come up asking for information on the town to create, which will then be added to the end of the current town list. The text area at the top is where you enter the name of the new town.
Click the button by the town size to select that size, and the button by the default terrain type to select the terrain the town will start with.
You will automatically be editing the new town. The scenario must be saved before you can create a new town.
The Main Menu
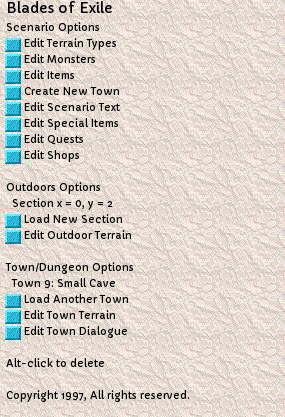
Figure 1: The Main Menu
The main menu is the first screen that comes up when you load or create a new scenario, and is where you load new towns and outdoor sections.
- Edit Terrain Types - When pressed, all of the terrain types appear in the right hand side of the screen. Click on a terrain type to edit it. For more information, see the chapter on Editing Terrain.
- Edit Monsters - When pressed, all of the monster types appear in the right hand side of the screen. Click on a monster type to edit it. For more information, see the chapter on Editing Monsters.
- Edit Items - When pressed, all of the item types appear in the right hand side of the screen. Click on an item type to edit it. For more information, see the chapter on Editing Items.
- Create New Town - This is the same as the Create New Town option in the Scenario menu.
- Edit Scenario Text - This is the same as the Edit Scenario Text option in the Scenario menu.
- Edit Special Items (Advanced) - When pressed, all of the special items appear in the right hand side of the screen. Click on a special item to edit it. For more information on special items, see below.
- Edit Quests (Advanced) - When pressed, all of the scenario's quests appear in the right hand side of the screen. Click on a quest to edit it. For more information on quests, see below.
- Edit Shops (Advanced) - When pressed, all of the scenario's shops appear in the right hand side of the screen. Click on a shop to edit it. For more information on shops, see the chapter on dialogue.
- Load New Section - At any given time, the scenario editor will only have one
outdoor section and one town active. To load another outdoor section for editing, press
this button.
A dialog box will come up, asking you to select an outdoor section to edit. The upper left section is considered to be X = 0, Y = 0. The sections to the right have a higher X, and the sections below have a higher Y. - Edit Outdoor Terrain - When pressed, you will start editing the current outdoor section.
- Load Another Town - To activate another town for editing, press this button, followed by the number of the town to edit.
- Edit Town Terrain - When pressed, you will start editing the current town.
- Edit Town Dialogue (Advanced) - When pressed, all of the dialogue nodes will appear to the right. For more information on how to edit dialogue, see the chapter in the next section on dialogue.
Special Items (Advanced)
Special items are given to the party during special encounters, and other special encounters can check for their presence. A key to a locked door might be a special item, and when the door is reached, the party will only be let through if they have that item.
To edit a special item, click on Edit Special Items on the main screen, and click on one of the special items to the right, or click Create New to make a new one. A dialog box will come up, in which you can edit the item's information.
The first two text areas are for the item's name and description (the description appears when the player uses the Special Item screen). If you want the party to start with the item, click the first button. If you want them to be able to use it, click the second button. When a special item is used, the game will call a given Scenario special node. To create or edit this special node, press the Create/Edit button. Special encounters are described in great depth in the next section.
Quests (Advanced)
Quests give a way to remind the party what they need to do next. They can also be used to create a job bank, similar to Exile III.
To edit a quest, click on Edit Quests on the main screen, and click on one of the quests to the right, or click Create New to make a new one. A dialog box will come up, in which you can edit the quest's information.
The first two text boxes are the most important, giving the quest's name and description (the description appears when the player uses the Quests/Jobs screen). If you want the party to start with the quest active, click the second button on the right.
Quests can be given a deadline. If the quest is not completed before the deadline, it will be considered failed, and the reward will not be granted even if it is completed anyway. If you want the quest to have a deadline, enter the day in the Must Be completed By field. If you click the first button to the right, the deadline instead gives the number of days they have to complete the quest. You can also specify an event - if the event occurs before the deadline, the player will be able to complete the quest even after the deadline passes.
You can specify a default reward for the quest, in XP and gold. This will automatically be given to the player when the quest is marked as completed. If you want some other reward (such as an item), you'll need to script it with special nodes.
If the quest is a job that should be offered at a job bank, click the third button on the right. Two more fields will appear. Each contains the number of a job bank in which this quest may appear. Enter a number in at least one of the fields. Then, when creating the job bank, enter the same number in the Which Job Bank field.