Section 4 - Editing the Outdoors
When you press Edit Outdoor Section at the main menu, you will find yourself in the outdoor editing screen. Here, you can edit your outdoor sections terrain, special encounters, wandering monsters, etc.
The Outdoor Editing Screen
The areas of the outdoor editing screen are as follows:
- Terrain Editing Area - This is where you view the terrain, items, and monsters you have placed, and place new things. To shift the view in the terrain area around, click on its border (click on the top border to shift the view up, etc.) or use the keypad. When placing a monster, item, etc., click on the appropriate space in the terrain area. To draw a spot of terrain, do the same thing. For more discussion of drawing terrain, read the Drawing Terrain section later in this chapter. One useful shortcut for moving around: Control clicking (or right clicking for Windows users) on the terrain border (or control pressing a keypad key) moves the terrain view as far as it can go in that direction.
- Terrain Selection Area - To draw a certain sort of terrain, click on that terrain's icon in the upper right hand corner. For a list of all the default terrain types and what they do, look in the appendices. Many of the terrain types have small icons, each of which represents special property. These are described in the Special Icons section, later in this chapter.
- Current Location - Each space in an outdoor section or town has a coordinate, a pair of numbers that uniquely identifies it. These numbers are the X coordinate, which is the column the space is in (0 the leftmost column, 47 the rightmost), and the Y coordinate, which represents the row the space is in (0 the top, 47 the bottom). For example, the upper left space is X = 0, Y = 0, and the lower left space is Y = 0, Y = 47. This Current Location area tells you the current location of the center space in the terrain view.
- Editing Buttons - These buttons activate the many useful features the scenario editor has. To find out what they do, read the section Editing Buttons.
- Current Terrain - The terrain type currently being drawn is shown to the right of the editing buttons. The second terrain shown there is the erase terrain, which will be used by the eraser tool or when you click a terrain of the same type on the map.
Editing Terrain
In all probability, the bulk of your scenario editing time will be spent painting the terrain onto the empty canvas of a blank town or outdoor section. While this can often be painful, tedious work, there are a number of shortcuts available to aid in the task.
Painting terrain works much like in any sort of painting program. To draw a line of walls, click on the wall icon to the right, move the cursor onto the terrain area, press the mouse button, and hold it down. Move the cursor in the shape of the desired wall, and release the button when done.
if you click onto a spot of terrain which is the same as the terrain you are painting, the spot will be erased, and replaced with a spot of ground.
There are two very important shortcuts available when drawing terrain, which make the job much less painful. First, the Blades of Exile editor will automatically adjust cave walls, mountains, hills, and water so that the edges line up properly (for example, if you draw a 3 x 3 square of cave wall, the editor will automatically place cave wall corner terrain in the corners of the square). Along similar lines, because mountains must be edged by hills to look right, when you draw mountains, ground around the mountains will be replaced by hills. Also, when you draw one piece of a multi-space tile, such as a large pile of rubble, the editor will automatically fill in the other pieces.
The second shortcut is the customizable keyboard shortcuts available for the terrain types. For example, when you press w repeatedly, the currently drawn terrain will cycle through the 3 different sorts of basic walls. See the chapter on Editing Terrain Types to find out how to change these shortcuts. The shortcuts for the default scenario are:
- a - Cave Wall
- b - Bed
- c - Cave Floor
- d - Doors (3 sorts, press d repeatedly to cycle through them)
- e - Dresser
- f - Floors (3 sorts)
- g - Grass
- h - Hills
- l - Water, Dark Blue Water, Lava
- m - Mountain
- p - Pillars (2 sorts)
- r - Rubble (4 sorts: cave, cave 2 x 1, grass, grass 2 x 1)
- s - Cave Stuff (4 sorts: 2 types of mushrooms, small stalagmites, large stalagmites)
- t - Trees (5 types)
- w - Walls (3 types)
- x - Windows (3 types)
- y - Chairs (4 types)
When you place a sign, you will immediately be asked what the sign will say when someone looks at it.
When you scroll to the edge of the outdoor section, you will be able to see one space of the next section. For example, if you scroll to the top of the view, you will see the bottom row of terrain spots in the next outdoor section to the north. You can't edit this row - it's just there to help you line the terrain up.
Rectangles with special descriptions are marked in the terrain screen as red rectangles.
Two terrain types that require special care are grass and cave walkways (near the start of the sixth row). The corners of walkways are rounded off when the game draws them. When cave walkways (the first of the two, marked with a C) are rounded off, it is with cave floor. When grass walkways (the second of the two, marked with a G) are rounded off, grass is drawn. Make sure to only use cave walkways around cave floor, and grass walkways around grass floor.
Editing Buttons
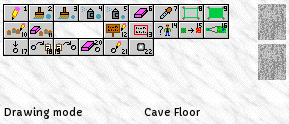
Figure 1: Terrain Editing Buttons
There are 23 different buttons for use while editing the outdoors (see figure above for a diagram of button positions).
- Draw Terrain: Press to draw terrain normally.
- Big Paintbrush: Draw a circle of terrain (9 wide).
- Small Paintbrush: Draw a small circle of terrain (3 wide).
- Large Spraycan: Spray a random sprinkling of terrain (area to spray on is a 9 diameter circle). The spray can will only place the terrain on ground. It won't spray onto walls, floor, etc.
- Small Spraycan: Spray a random sprinkling of terrain (area to spray on is a 3 diameter circle).
- Eraser: Replace a 3x3 square around the area selected with the current ground (cave floor or grass, depending on which you last drew).
- Eyedropper: Click on a terrain spot to make that spot the current terrain.
- Empty Rectangle: Create a rectangle of the current terrain. Only the edges of the rectangle are drawn with that terrain. The inside is left alone. To place a rectangle, press this button, select the upper left corner of the rectangle (on the terrain area), and then select the lower right corner.
- Full Rectangle: Like Empty Rectangle, except that the rectangle selected is filled with the current terrain.
- Set Town Entry: Set the town that is entered when the party walks into a town/dungeon/tower space in the outdoors. To place a town, draw a town spot in your outdoor section, press this button, click on the town, and enter the number of the town to be entered.
- Clear Town Entry: Clear any town entry set on the selected space. Even if it is a town, the party will not enter town when walking into a space whose town entry has been cleared.
- Edit Sign Text: Change the text on a sign. Press this button, and then click on the sign to edit.
- Set Area Description: Each outdoor section can have up to eight rectangles with brief area descriptions, which appear on the text bar in the game when the party enters the rectangle. To place a description, press this button, click on the upper left corner of the rectangle to place, and finally click on the lower right corner. You will be asked for the area's description. To change the description or delete an area, select Edit Area Descriptions in the Outdoor menu.
- Place Wandering Monster Location: There are always four spaces in an outdoor section where wandering monsters can appear. To set these locations, press this button, and click on the four spots in your terrain. Be careful not to place these spaces in water, mountains, or other inaccessible spots.
- Replace Terrain: You can have the program go through your terrain and randomly change
spots of one terrain type to another (for example, to make a forest, you can change grass
to trees). To do so, press this button.
When you do, a dialog box will come up. Enter the number of the terrain to change in the first box (to select a terrain type, press the Choose button), the terrain to change it to in the second box, and the chance of any given spot being changed in the third box (0-100, 0 being never and 100 being always). Press OK to do the replacement. - Change View: Change the terrain view from zoomed in to zoomed out, and back again. When zoomed out, you can't see monsters or items, but you can get an overall look at your work. Also, you probably only want to use the large paintbrush in this view.
- Place/Edit Special Encounter (Advanced) : To place a special encounter on a space, press this button and click on the space. To edit a special encounter, press this button, and click on the special encounter. To find out about special encounters, read the Special Encounters chapter in the next section.
- Copy Special (Advanced) : If you want several copies of the same special encounter in your outdoor section, you can copy and paste it. To copy a special, press this button, and click on the space with the special encounter.
- Paste Special (Advanced) : To paste a special encounter you've copied, press this button and click on the new location for the encounter.
- Erase Special (Advanced) : Removes a special encounter. Note that this doesn't delete the special nodes the special encounter called. It simply removes the encounter from the terrain, so that the nodes aren't called when the party steps there.
- Set Special (Advanced) : Selects the outdoor special node called when the party steps on a space. When you press this button and click on a space, you will be asked for the number of an outdoor special node. The node you give will be called when the party steps on this space.
- Toggle Special Spot (Advanced) : Toggles whether there is a white special encounter dot on the space.
Outdoor Menu
The Outdoor menu also has a number of important features.
- Outdoor Details - Select this to set the name of your outdoor section and a few other details (see below for more information).
- Outdoor Wandering Monsters - You can have four different outdoor wandering encounters created when the party walks through this section. For more on outdoor wandering encounters, read the section later in this chapter.
- Outdoor Special Encounters (Advanced) - You can also have 4 outdoor special encounters, which are created by special encounters. These are edited in the same way as wandering encounters.
- Frill Up Terrain - This randomly changes some grass spaces to grass with rocks or grass with flowers and some cave floor spaces to cave floor with small mushrooms, to give the terrain a little more varied appearance.
- Remove Terrain Frills - This changes grass with rocks or grass with flowers back into ordinary grass, and cave floor with small mushrooms back to cave floor.
- Edit Area Descriptions - Select this to edit the eight rectangles with brief area descriptions (to find out how to place these, read Set Area Description, above). Alt-click to remove rectangles, or click to edit the text.
- Set Starting Location - You need to set a location in the outdoors for the party to be at when they leave the town they start in. To set this, select this option, and click on the appropriate space in the outdoors.
- Edit Special Nodes (Advanced) - This moves you to the main screen, where all of the outdoor sections special nodes are listed to the right. Click on a node to edit it.
- Edit Outdoor Text (Advanced) - This moves you to the main screen, where all of the outdoor section's text messages are listed to the right. Click on a message to edit it, or alt click to clear it.
- Edit Outdoor Signs (Advanced) - This moves you to the main screen, where all of the outdoor section's signs are listed to the right. Click on a message to edit it, or alt click to clear it.
Outdoor Details
This dialog lets you set a few important details about this outdoor section.
- Name: You can change the area's name here.
- Ambient Sounds: The sound selected here will be played occasionally while the party is in this outdoor section. If you select Drops or Birdsong, the game will select between two or three distinct sounds at random. If you select Custom, you can choose any single sound to play.
- Backgrounds: You can set the background to appears behind the game interface when the player is in this outdoor section, and a separate background to use when they enter combat mode in this outdoor section. You can also set default backgrounds for towns and dungeons in this outdoor section (a town is considered to be a dungeon if its light level is anything other than fully lit). The combat background will be shown for both town and outdoor combat, unless an individual town overrides it. If any of these are left at -1, the game uses the defaults set in the scenario details.
- Comment: This is a space for you to add notes to yourself.
Outdoor Wandering Encounters
No outdoor travel would be complete without a few fights. Your main tool for providing action outdoors is the outdoor encounter editing windows (accessed by selecting Outdoor Wandering Encounters or Outdoor Special Encounters from the Outdoor menu). You can have 4 wandering and 4 special encounters.
When you select these options from the Outdoor menu, the encounter editing window will come up. Use the arrow keys to select different encounters to edit. An outdoor encounter can have 7 sorts of hostile creatures and 3 sorts of friendly ones. Press the Choose button to pick a monster. Note that an encounter must have at least 1 hostile monster before it appears. Each slot has a different number of monsters that appear, listed to the left.
Other options:
- Monster Can't Flee Party: If selected, the encounter will not flee, no matter how strong the party is. This should always be set for special encounters.
- Encounter Is Forced: The party will fight the encounter as soon as it appears, even if it isn't anywhere near the party. This should always be set for special encounters, but almost never for wandering encounters.
- Special Called When Encounter Starts (Advanced): The number of an outdoor special node to be called when the encounter begins. Press Create/Edit to set and edit the special. One warning: if this encounter follows the party into a different outdoor section, the special node in the new section, not the old section will be called, probably causing a problem. To get around this, only use this for monsters with Encounter Is Forced set, or with encounters that can only be fought in the outdoor section they're placed in (like in a 1x1 outdoors).
- Special Called When Party Wins (Advanced): The number of an outdoor special node to be called when the party defeats the encounter.
- Special Called When Party Flees (Advanced): The number of an outdoor special node to be called when the party escapes the encounter.
Special Icons
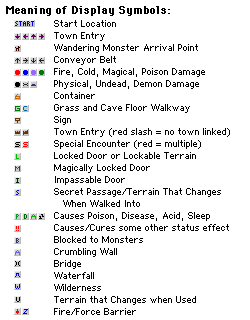
Figure 2: Meanings of the Display Symbols
The terrain icons to the right and the terrain spaces in the terrain editing area often have small icons, which represent special properties of the spaces/terrain types: